First Generation Magna Carby to EFI Conversion
This page describes how to convert an unleaded TM/N/P Magna with carby to EFI. This is based upon my experience with a TP, but other models should be the same or similar.
If you are convering a leaded Magna, you will also need a new fuel tank and wiring for the fuel pump. This isn't described below.
What you need
- EFI Plant (Manifold, plenum chamber, injectors and rail, fuel pressure regulator, throttle body and sensors)
- Air Flow Meter, Filter and Housing
- EFI Engine Wiring
- EFI Exhaust system from manifold to flange before rear muffler
- Oxygen Sensor (probably still screwed into the exhaust manifold)
- EFI Fuel Pump
- EFI Fuel Filter and mounting bracket
- EFI fuel lines or screw connections from donor with high pressure rubber hose and decent hose clamps
- EFI Electronic Control Unit (ECU)
- ECU Fuel Control Relay (Under the dash)
- ECU Power Relay (under the bonnet)
- EFI Coil and Power Transistor
- EFI Distributor
- Rubber block from the centre connector on the charcoal canister
- For manual carby models only - instrument cluster from an automatic or EFI vehicle
- EFI Throttle Cable
Removing the carby running gear
You of course need to remove the inlet manifold, carby and exhaust. The wiring you need to replace is the "engine controls wiring" it plugs into a number of plugs located behind the dashboard on the left hand side of the car. You will need to remove the dash, heater fan and centre console to access it. Once these items are removed, pull the carpet back to reveal the firewall and look for a clump of wiring coming through the left hand side. Unplug anything plugged into this wiring inside the vehicle.
If the vehcile is fitted with an automatic transmission, you must unplug the wiring from the transmission computer, located under the centre console. You will also need to pull the carpet back to unscrew the earth wires and push the wiring through.
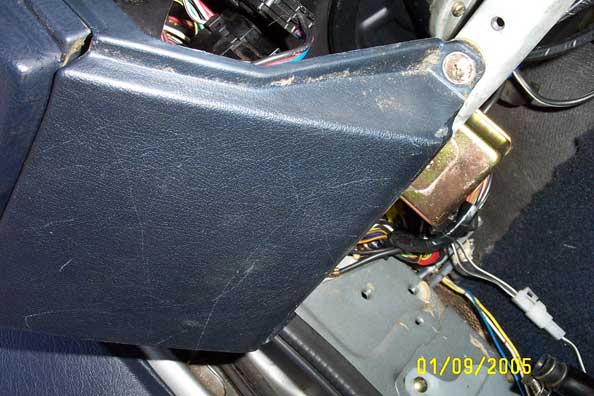
Remove the left hand side kick panel, unscrew any earth wires and remove the fuel pump relay, this is no longer needed.
Once everything is unplugged from the harness, push the black plug outside the car and feed the wiring through the firewall through-hole.
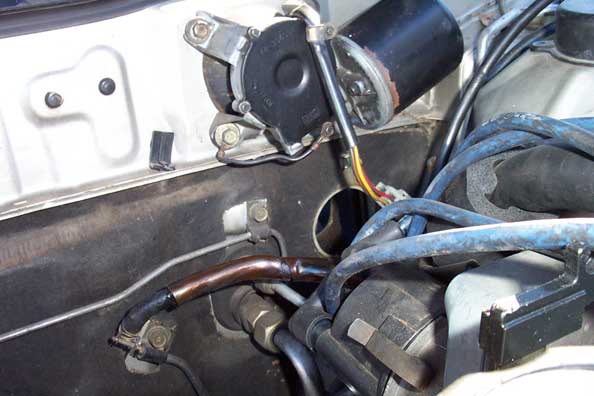
Working under the bonnet, unplug anything attached to the wiring coming out of the firewall (that you just pushed through). This should be coil, distributor, brake booster, air-conditioning idle up solenoid, brake warning light and automatic transmission. The harness plugs into a round plug near the engine fuse box.
The tricky part is removing the harness from the body. Unscrew any mounting brackets and pop the retaining clips from the firewall. Also note that there is a single 10mm bolt behind the brake booster holding the wiring in.
Once the wiring is removed, remove the fuel filter and mounting bracket and the coil (and it's mounting bracket). Do not remove the distributor at this stage.
Once you are finished under the bonnet lift the rear of the vehicle and secure it on stands. If the fuel tank has fuel in it, drain it then take the fuel pump out. Make sure to undo the bolt on the bottom of the tank as well as the screws at the rear of the pump.
While you are under the rear of the car, undo the rear flange on the exhaust. Then undo any other bolts/mounts holding the exhaust up and remove the exhaust from under the car.
Under Bonnet Installation
While everything is out of the way, it is best to install the engine controls wiring. Feed the wiring from the outside, into the interior via the Firewall through-hole.
At this stage, roughly lay out the wiring that lives under the bonnet so that installation of the components is easier.
Once the wiring is roughly in place - install the EFI fuel filter and mounting bracket. You will notice that there are 2 bolt holes on the firewall and only one is threaded. One bolt will hold the filter there quite happily. You will also need to determine how you want to do the fuel lines - replace or adapt. If you choose to replace you will need to replace all fuel lines at the front, rear and underneath.
If you choose to adapt get some high pressure fuel line that will fit over the car's metal fuel line. Around 1 meter is recommended. You also need heavy-duty hose clamps and the screw fitting off the EFI vehicle. Cut the rubber fuel hose long enough so that it slides well over the car's existing fuel line and the metal piece of line with the EFI filter screw fitting. Clamp it tightly on both ends of the rubber hose. Once this is complete you should be able to screw the hose from the EFI filter into your adapted fuel line.
While you are working on this side of the car, remove the hose from the charcoal canister marked "To Carb ->" and replace it with the little rubber block from the EFI car. Also replace the other hoses and vaccum switches and note where they ran to and from.
Plug the round connector near the relay box, brake pressure switch, gearbox wiring and any other connectors on this side of the vehicle back in.
On the left hand (passenger) side of the car install the coil and ignitor where the old coil was mounted.
Run the Oxygen sensor wiring to the front of the car and bolt the plug bracket to the radiator.
Take the distributor cap off the distributor and mark the relationship of the rotor to the distributor (or remember where it was pointing). Undo the nut and pull the distributor out. Install the EFI distributor, making sure that the rotor is in the same position as it was before.
plug the relay for the ECU into the engine relay box. It is marked XXX
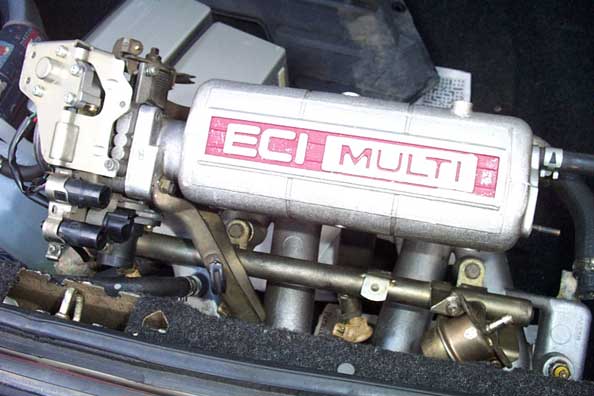
You can now install the EFI Plant and exhaust manifold. The only things to point out here are:
- On the firewall there are two black plugs on the left-hand (passenger) side, remove these and plug the holes on the other side of the firewall. This is where the fuel pressure control solenoid for the fuel pressure regulator goes.
- You will need a new piece of rubber hose to go from the metal fuel return line to the fuel pressure regulator. The old rubber return line is too short.
The vacuum hose system on an EFI Magna is much simpler than the carby models. One comes from the plenium chamber and runs to the fuel pressure control solenoid, one runs from the fuel pressure regulator control solenoid and another runs from the purge valve for the charcoal canistor.
Install the mounting bracket for the air filter housing on the left hand side of the car, you will see the holes for this. There is another bracket that sometimes forms part of the transaxle mount and sometimes bolts to it. If yor car has neither, dont worry as the air filter will hold fine with just two bolts.
Once you have connected all the radiator hoses, vacuum hoses and fuel lines you can install the air filter housing.
Interior Installation
Working in the left hand side of the vehicle, you should see a mass of wires coming through the firewall. Pull them so they are out of the way at the moment.
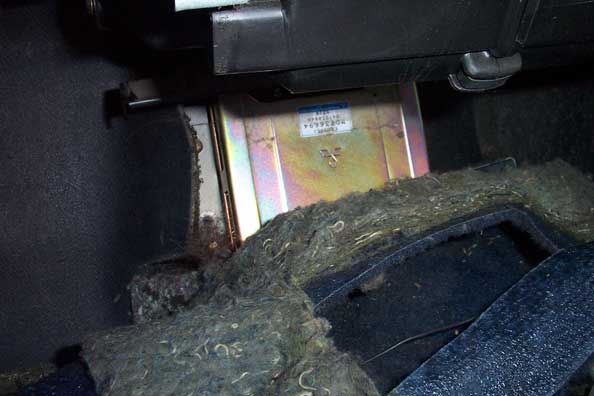
Install the ECU cradle on the left hand wall of the car, it should side up the inside and lock over a threaded pin at the top. Then slide the ECU into the cradle, with the wiring connector facing the floor.
If the vehicle is fitted with an automatic transmission, feed the wiring for the transmission control unit under the floor to the ECU. Plug it in and don't forget to screw the earth to the floor!
Roughly lay out where the rest of the wiring goes and plug it in if possible. There are a few earth wires that can be bolted to the one of the bottom bolts on the ECU. You can now bolt the ECU into place.
Check that all the wiring is connected (the only left over should be the plug for the fuel control relay).
Reinstall the heater blower box.
Install the fuel control relay to the dashboard whilst it is out of the car, it goes under the vinyl cover next to the glovebox.
Swap the throttle cable over, it is alot easier to do while the dash is out as you can really see what you are doing. It is much like the wiring, pop the plug out of the firewall and feed it through once you disconnect it from the pedal.
You can then reinstall the dashboard, console and instrument cluster.
Underneath the vehicle
Once the under bonnet and interior components are installed and reassembled it is time to crawl under the car again. Lift the rear of the vehicle and secure it.
Working from the back of the vehicle, install the fuel pump into the tank. Put the bolt in the bottom of the tank before doing the screws on the back of the pump. You will notice that the pump plugs straight in.
You will notice however that the pump wont screw into the car's fuel lines unless you have replaced them. If you are using the rubber hose method, get the rubber hose you took from the other car and screw it to the pump's fitting. Cut a piece of your spare metal fuel line (about 5cm long) and slide half of it into the rubber hose with the screw connector. Clamp it tightly. Cut a piece of your new high pressure fuel hose so that it will run from the hose attached to the fuel tank to the car's metal lines. Make sure you have plenty of hose to fit over either end and clamp each end.
Once this is done, install the EFI exhaust system to your car. There is nothing terribly special about this, it uses the same mounting points as the carby models. I found the easiest way is to seperate the underbody section into 3 pieces - forward of the catalytic convertor, the cat itself and from the cat back. Make sure you get new flange gaskets for all joints (there should be 4) and use muffler putty to help seal them.
That's it
Once the above is done, the car should be right to go! Make sure you check for any fuel and exhaust leaks and rectify them immediately.
If you would like clarification of any point or to make a suggestion please use the discussion page, which can be found at the top of this page.
Disclaimer
This article is a recount of the process I went through to install EFI in a Carby Magna. I accept no responsibility for any damage that may occur from you following this process.